Tuesday, July 30, 2013

Smashed Blueberry Loaf


Some recipes you save and forget, some recipes you book mark and maybe eventually make and some recipes make you jump off your chair and get baking!  Friday I did just that.  Saw this amazing looking blueberry loaf, jumped out of my seat, and made it.  You know what, it was really a good decision.  It is packed full of deliciousness.  I did not do everything it says because I am just like that.  For one, it has a lemon glaze.  I am quite sure it would be over the top delicious with it.  But I chose not to do it.  Still very delicious just the same.  I love it so much that I am making it again and this time into muffins.  YAH!

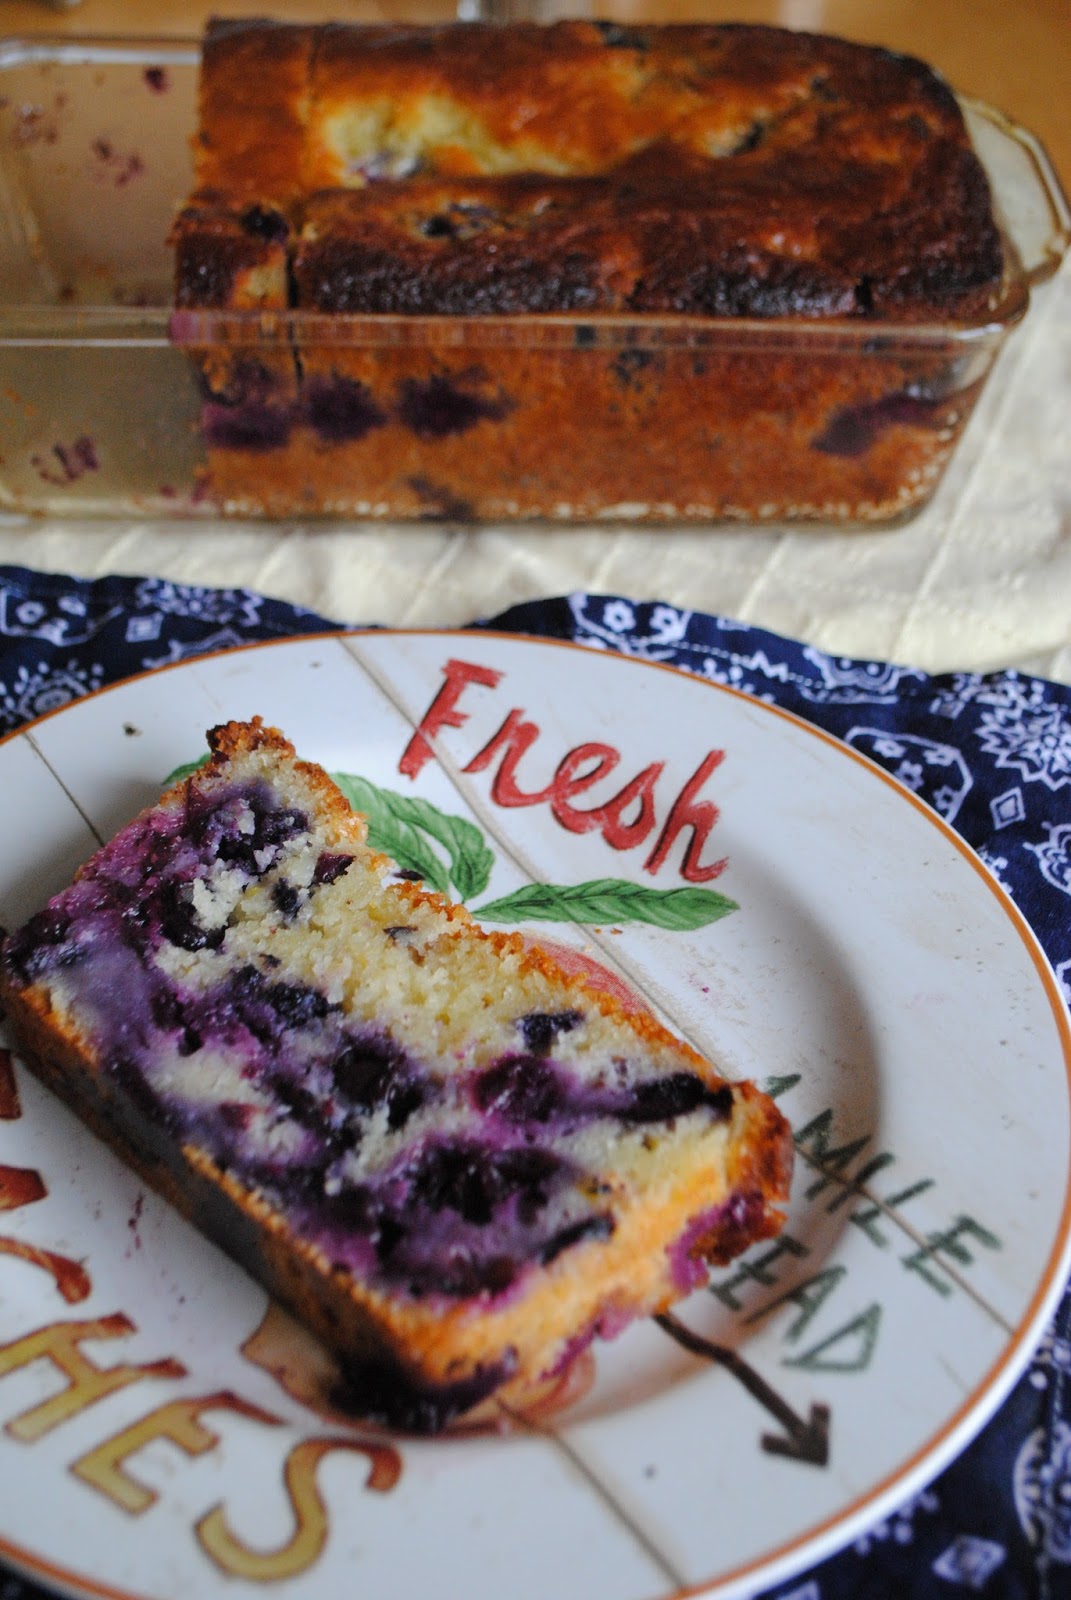
And yes, it is a little sunk in the middle in the above picture because I had to go and pulled it out about five minutes too early.  You would not know the difference though.

So if you want to see the luscious original recipe head on over to Parsley Sage and Sweet.

Smashed Blueberry Loaf


nonstick neutral oil spray
1 1/4 cups all-purpose flour
2 teaspoons baking powder
1/2 teaspoon kosher salt
1 cup sugar
1 tablespoon grated lemon zest
3/4 cup Nonfat Greek yogurt
1/2 cup coconut or vegetable oil (Make this cake 100% fat-free using apple sauce in place of oil!)
2 large eggs
1 teaspoon vanilla extract
3 cups whole blueberries, lightly smashed
1/4 cup flour for coating the smashed blueberries*


1.  Spray a 9 x 5 inch loaf pan with cooking spray.
2.  Whisk the 1 1/4 cups all-purpose flour, 2 teaspoons baking powder, and 1/2 teaspoon kosher salt together in a large bowl. 
3. In a medium bowl whisk together 3/4 cup Nonfat Greek yogurt, 1/2 cup coconut or vegetable oil, 2 large eggs, lemon zest and  vanilla extract until smooth.
4.  Combine the wet ingredients with the dry ingredients and stir together until just combined.
5.  Place all the blueberries in a bowl and mash a little, leaving some whole.  Put a 1/4 cup flour to coat, making sure to mix it into the blueberries completely. Fold the flour coated, smashed blueberries into the batter – making sure they separate and don’t clump together.
6.  Pour the batter into the greased loaf pan.  Bake in a preheated 350 F oven, middle rack, until puffed and golden brown on top... about 50 – 55 minutes.  A test skewer should come out clean.. a few moist crumbs sticking is okay. Let the cake cool in pan on a wire rack for 15 minutes before flipping.


Sunday, July 28, 2013

Bread and Butter Pickles

This is the summer of the pickle.  I have run out of pickles except for my turmeric pickles.  I made bread and butter ones, I am going to make zucchini ones, I plan to make some dill relish as well and yesterday I made two kinds of pickles.  I made my usual refrigerator ones and I made these zucchini ones that I put in the left over juice from the bread and butter ones I made a couple days ago.
So, why am I showing you this funny pic of my gloved hand?  I can't stand that feeling you get after touching zucchini.  You know the feeling... when it feels as if the moisture has been pulled right out of your skin. I do this with butternut squash as well.  The riper it is the more I have to do this.  Stuff from the grocery store, mid winter will not do this to me.

My mother suggested some years ago that it was natural alum in the vegetable.  I have not found any proof of that yet.  But I wouldn't be surprised either if she was right.  It certainly feels like alum.  For those of you who do not know what alum is, click here to read about it.

In searches I have found that I am not alone in this reaction to squashes- especially butternut and zucchini.  There is a thread on Chow and an interesting post from this person but know has said what the chemical/compound is?????  And for people like me this only spurs me on to look into it further.  Maybe Cornell Cooperative Extension will know.  Yes, I am quite silly like this.  Toddler ish I am .... why? why? why?  But I guess that is how we all learn.  So while you will not find me exploring the pages of People magazine wanting know what's up with the stars.  You will find me researching butternut squash. Ha!


Bread and Butter Pickles

adapted from this recipe

16 cups cucumbers
6 cups onions, sliced
1/4 cup canning salt
4 cups vinegar
4 cups boiling water
2 teaspoon mustard seeds
2 teaspoon celery seeds
1 teaspoon turmeric
3 cups sugar

Mix together cucumbers, onions and salt.  Let sit two hours.

While the cucumbers are in the salt mix the seasonings, vinegar, water and sugar.  Bring it to a boil about when the cucumbers are done soaking in the salt.  Rinse the excess salt from the pickles.  Add the pickle onion mixture to the brine (vinegar, water, sugar and seasonings).  Cook five minutes.  Add to jars and seal.

Meanwhile, you should also get water boiling in the canner.

Place jars into boiling water in the canneror at least hot.  Process for ten minutes.

What does process mean?  It means boil the jars with their contents in them and sealed.  Processing does not officially begin until it boils.  So when it says
ten minutes in the canner, it means ten minutes from when it starts boiling.  

Once out of the hot water bath, place on towel and you will begin to hear them popping.  This sounds lets you know they are sealed correctly. The lid will be depressed.  Sometimes this can take  awhile so don't fret it.


Saturday, July 27, 2013

Gomen Wat


We are still awaiting our beloved Ethiopian restaurant to reopen.  It closed a little over a year ago due to landlord issues.  They have relocated and hope to open soon but first they must filter through allthe red tape.  Dang, I miss their injera!

In the mean time, I must fend for myself trying to make something like the fabulous food they serve.

This recipe for Gomen wat was pretty good.  Its probably a lot less calories than the restaurant we go to.  I suspect they use a but more butter.  I did everything the same except that I added the seasoned butter, niter kibbeh and at the end I added 1/3 of a cup of heavy cream.

GOMEN WAT  Ethiopian Collard Greens

Recipe adapted from this recipe.

1 pound(s) collard greens (rinsed, trimmed, chopped)
2 cup(s) water
2 tablespoon(s) olive oil
3/4 cup(s) chopped onion
8 garlic cloves, chopped

1 tablespoon(s) lemon juice
1 teaspoon(s) salt
1 teaspoon(s) ground tumeric
1 teaspoon(s) paprika
1 teaspoon(s) allspice, ground
2 tablespoon(s) ginger root, minced

Place chopped collard greens in a pot with 2 cups of water. Bring to a boil, then reduce heat to low. Cover, and simmer until collards are tender, about 20 minutes. Drain, but reserve the cooking water. Set aside.

Heat 1 tablespoon olive oil in a pot over medium heat. Stir in onions and cook until just beginning to brown, about 10 minutes.  Stir in garlic and cook for 1 minute.

Add the cooked collards, 1 tablespoon olive oil, and the reserved cooking water. Simmer, uncovered, over medium-high heat until liquid is nearly evaporated, 10 to 15 minutes.

Add the lemon juice, salt, turmeric, paprika, allspice, and ginger root.Cook until everything is heated through. Add n

Thursday, July 25, 2013

Buffalo Chicken Wings at The Anchor Bar


When you are in Buffalo NY - you have to go to The Anchor Bar (well, if you are a meat eater).  My sister in law requested this when we talked about our day visiting Frank Lloyd Wright houses.  There was certainly no objections on my part.
Many A few years ago, when I was in my early twenties, my friends and I shuffled off to Buffalo for wings.  It was not nearly as famous then as it is today.  It was a whole lot smaller and not as decorated as it is today.  We would have wings and a drink and listen to some rhythm and blues.  One lady in particular made me realize that I even liked rhythm and blues.  I bought a few cd's after that and still enjoy listening to it.  So, aside from discovering some great chicken wings, I discovered a music genre.  Thanks Anchor Bar.  he he.
Had to order a big one.  Who's brilliant idea was that?  Oh yeah, me. eh hem.


Of course, I didnt really have to twist anyone's arm- we ate them anyway.  And just for the record, my artist/engineer brother had to arrange them in an artist like fashion.

I kind had to fight to eat some...

A round of ZUMBA was definitely on the menu the next morning and the next morning and the next morning....

Monday, July 22, 2013

LEMON DROP CAKE

My brother and his wife have been visiting from Knoxville, TN.  We have been going so many places around town.  It has been a whirlwind visit.  I did lots of things that I have been meaning to do, but just havent.  They gave us the impetus to go.  Like Corning Mueum of Glass.  And Frank Lloyd Wright houses in Buffalo.  I will share more on them later.

Why is it people who live near points of interest rarely go to those places?

I will share with you a dessert I made while they visited.  Its really quick and really easy.  I rarely do cake mixes.  This one is worth me buying the cake mix to make it.  

Lemon Drop Cake

for the cake
1 pkg. Lemon cake mix
1 cup buttermilk
1/3c - lemon juice (remove 1/3 cup water from the cake requirement from the back of the box)
1 - 3oz. lemon instant pudding mix (dry)


lemon glaze
2 c confectioner’s sugar
1/3 c lemon juice
zest of one lemon
3 Tbsp water

In large bowl, stir together dry cake mix and pudding mix with a whisk, making sure to flatten the lumps. In another bowl, combine all wet ingredients; eggs, buttermilk and lemon juice to make up the difference of the amount of liquid called for with your particular box of cake mix.  For instance, if it calls for 1 1/4 cups water in the recipe, then you would add 1 cup of buttermilk and 1/4 cup of lemon juice.

Add the wet ingredients to the dry mixture and beat until combined.

Bake in a greased 9x13 baking pan in a preheated 350 degree oven for the time the cake mix box calls for...depending on your oven. It will require a couple minutes longer baking time than cake mix box calls for because of the extra moisture produced by the milk. Stick a toothpick in the center to check to see if it is baked through.


icing
Combine water, powdered sugar, zest and lemon juice with a mixer until smooth. Add one more tablespoon of water if consistency isn’t saucy. “Glaze” the cake when just a little cooled. Poke holes in cake with toothpick for extra glaze 'penetration'.  You will have some left over depending on how much you slather on.

Saturday, July 20, 2013

Banana Frozen Bon Bons

A delicious summer treat.  

Totally easy, it can't be beat.  

Frozen banana bon bon

Make you say nom nom

Your kids will thank you

Bonus nutrition too.


I know, I am a corn ball.  I admit it.


Slice bananas thin, slather peanut butter on it. Freeze on a cookie sheet.  Remove from the freezer and dip in melted chocolate.  Whoa!  You could sneak one now.  By the time you finish doing all of them, the first ones with chocolate will already be frozen.  Return.  After about a half of an hour- store in a container. 

If you are not into peanut butter, just make banana chunks instead.

Wednesday, July 17, 2013

Lake Minnewaska

 Lake Minnewaska in New Paltz, NY.  Click here to go to the website.


My husband laying on the edge to capture this picture.

Surprise Rhodendrum in the woods.

Monday, July 15, 2013

DOUGH ANXIETY


Hey- you know- you are not alone is you find yourself afraid of any recipe with yeast in the ingredient list. Fear not, I have some info for you.

First, let me tell you how I was when I first started making bread.

I was totally frantic when using yeast.  I had it in my mind that things had to be perfect.  All conditions had to be just right and maybe the moon had to be blue too.  I balked at the mess I was about to make.  But I was determined to have the bread-y goodness for my family.  So I trudged on.  After I mixed it, I had it in my head that there simply was no time to do anything but get that dough into something and cover it immediately otherwise it was going to fail.  I baked bread like that for quite a while.  Rushing it in to a bowl and covering it before I even washed my hands.  All the while tense and worried.  Seems silly now looking back.

BTW, the first time I made bread was when I was 19 and I never let it rise. A brick, I tell you.C

The secret here is- there really is no magic to make good bread.  Quite frankly, it's darn easy.  Not to much you can flub up if you got the basics down.

Here are the basics to making good bread.

1.  Proper water to flour ratio.
2.  a good rise.
3.  the right amount of baking time.

Now, I know some veteran bread makers are going to say- pasha, so much more is required than that.  Well, yes and no.

Too make a plain ordinary loaf, no, not much more than that is needed. You got your recipe and you follow it.  It's not scary.  Maybe a little time consuming but not really.  You mix it- 20 minutes maybe.  And the rise, yes, takes a long time.

Now, as you go along the bread making journey you may find that if you do this little trick it will add more flavor and if you do this little trick it will yield a crusty dough, and on and on it goes.  Those things will help you make great bread.

Whether you are a beginner or a veteran- people, your family and friends, will appreciate your effort. Nothing says warmth and goodness like a nice home baked loaf of bread.

Here are a few links to some mighty easy breads for you filled with trepidation bakers:


One Good Thing by Jillee-  Carole's English Toasting Bread
This recipe makes four loaves.  You can freeze three and have your bread making for the week done in one day.   All you do is mix it in a bowl or the food processor,  Divide into pans, let it rise to the top of the loaf and bake.  That's it!

Artisan Bread in Five Minutes A Day
Lots of books and lots of recipes on their site.  Stir it up, let it rise and break off what you want each time you want fresh bread.

For you cheaters out there- some baking soda bread- no yeast but nice bread nonetheless.

And just in case you might be interested here are a few tips that will help you make great bread.

1.  Use good flour.
2. Make a poolish or a biga. More info- click here.
3. Make it warm and toasty where you let it rise.  I use my microwave. If it is cold out I put a hot glass of water in the microwave with the dough.
4. When shaping loaves, tuck it around and pinch closed.
5.  Use a meat thermometer to check for proper temp. 200F.
6.  Spray loaves with water when baking to make the loaves crustier.
7.  Let the bread cool after its removed from the oven.  Optimum time is one hour.  (its very difficult but worth it. Sometimes though its worth it just to tear through, melt butter on it and eat it with whatever you fancy- soup... whatever).
8.  Read some books on the subject.  David Leader and Peter Reinhart are my favorites for the science of bread and great recipes that turn out excellent tasting bread.

Some of the breads I have made:

Anadama (along with a post about the stages of becoming a bread baker.


Olive Spelt Bread


Cottage Cheese Dill Bread
 

Psychedelic Beet Bread

Cheese Bread


Country Crust


Rosemary Olive Bread

Dutch Oven Bread
 

Cheesey Gruyere Buns


Hamburger Buns

Colonial Yeast Bread

Skillet Bread

 Butter Buns

Molasses Rye Bread

There is more if you should be so inclined.  I just wanted you to get a taste of the bread.

Thursday, July 11, 2013

Pear, Gorgonzola and Pecan Flatbread

I went to the Cheese Cake Factory restaurant some time ago with some friends.  I ordered this appetizer that was a flat-bread.  It had pears, Gorgonzola, pecans and arugula over top.  It was insanely delicious. I decided to recreate it at home.

You could use any dough, I just happened to have picked up some dough from Trader Joe's.  They have this herb dough that I like to get sometimes. I used that, dividing it into three and rolling into balls.  I rolled each one out to make an oblong disk.  Unfortunately, I had all the ingredients except for the pear so I used apples.  Sprinkled about 1/3 of a cup of Gorgonzola over the top and then chopped pecans and chopped apples.  I baked it in a 425F oven until he dough looked golden on the sides.  Then I topped it with chopped arugula.

It was delicious but next time I want the pears.

Monday, July 8, 2013

BEST BEAN BURGERS


Summer is always crazy... Fun and crazy busy.  But would I have it any other way?  Nope, I am grateful to enjoy each and every moment.

We have had a blast going every year to this local farm near by.  Its always a pleasure.  This year we got to see the peacock with his tail feathers up.  He was trying to impress this girl peacock.  Who really, looked like she could care less that he was all decked out in his peacock glory.  I didn't know the span was so big.  Nor did I know that they kind of back up to the female and then spin around and shake those beautiful quills.  What a freaking hoot.  He gave us hours of laughter, watching and then telling the story over and over again.


BEST BEAN BURGERS

If you like, the original recipe is here at Food Network.  I doubled the recipes and replace the bread crumbs with panko.  I find it to yield a better burger.  I also have swapped out pecans one time and black beans for white another time.


If you cook none of the bean burgers on my site- this would be the one to try.  It is perfect!

2/3 cup barley
3 tablespoons extra-virgin olive oil
1 large onion, chopped
2 stalks celery, chopped
Kosher salt
4 cloves garlic, chopped
5 tablespoons barbecue sauce
2 medium carrot, finely grated
2 cups canned pinto or black beans, drained and rinsed
2/3 cup panko crumbs
2/3 cup walnuts, chopped
4 teaspoons soy sauce
3 large egg whites
2 tablespoons chopped fresh parsley
6 soft buns, split


Prepare the barley as the label directs. Let cool completely.

Heat 2 tablespoons olive oil in a large skillet over medium heat. Add the onion, celery and a pinch of salt; cook, stirring occasionally, until golden, 12 to 14 minutes. Add the garlic, 3 tablespoons barbecue sauce and the carrot; cook, stirring, until the mixture dries out slightly, 1 to 2 minutes. Transfer to a food processor and let cool completely.

Add the barley, beans, panko crumbs, walnuts, soy sauce, egg whites, parsley and 1/2 teaspoon salt to the food processor. Pulse until finely ground with some chunks. Form into six 4-inch-wide, 1/2-inch-thick patties and place on a baking sheet lined with parchment paper. Cover and refrigerate until firm, 1 to 4 hours.

Heat a skillet and place a small amount of olive oil on it.  Season them with salt and pepper if you like.  Place 'burgers' over medium heat and let them get brown before flipping.  You want it to take longer to cook and toast to help the insides get done.  Flip and brown on the other side.  For some added pow, melt a slice of cheese on top.